Proyecto: Implementación de HomeLab para prácticas de ciberseguridad
Autor: Daniel Carrión
Rol: Estudiante de Ingeniería de Sistemas (6to ciclo)
Fecha de última actualización: 20-05-2025
1. Resumen
Objetivo General: Diseñar e implementar un entorno virtual controlado que permita simular escenarios reales de ciberseguridad, incluyendo pruebas de penetración, gestión de vulnerabilidades, monitoreo de eventos y respuesta ante incidentes. Este laboratorio busca fortalecer habilidades técnicas mediante prácticas operativas, integrando herramientas clave como pfSense, Suricata, Splunk, Nessus y Active Directory.
Alcance Técnico: Se desplegaron servicios esenciales como Active Directory, DNS, DHCP, IDS/IPS, SIEM y escaneo de vulnerabilidades. El entorno incluye estaciones de trabajo, servidores Linux y Windows, y zonas segmentadas (LAN, DMZ, WAN).
Resultados Clave
-
Splunk recibe logs de estaciones, servidores y pfSense.
-
Suricata detecta y bloquea tráfico malicioso.
-
Nessus identifica vulnerabilidades en LAN y DMZ.
-
Las reglas de firewall segmentan correctamente el tráfico.
2. Contexto y Motivación
Motivación Personal: La creación de este laboratorio responde al deseo de adquirir experiencia práctica en ciberseguridad ofensiva y defensiva. El entorno permite validar conocimientos teóricos mediante simulaciones reales, facilitando el aprendizaje por descubrimiento y la mejora continua.
Retos Iniciales
-
Configuración de red segmentada con múltiples interfaces.
-
Integración de herramientas con flujos de logs consistentes.
-
Validación de conectividad entre zonas para escaneo autenticado.
Beneficios Esperados
-
Consolidación de habilidades técnicas en entornos reales.
-
Preparación para certificaciones como CompTIA Linux+, Pentest+, etc.
-
Creación de un portafolio técnico demostrable.
3. Objetivos Detallados
-
Segmentar WAN / LAN / DMZ con pfSense.
-
Desplegar Active Directory + DNS en LAN.
-
Integrar Suricata como IDS/IPS.
-
Instalar y configurar Splunk Enterprise + Universal Forwarders.
-
Ejecutar auditorías de vulnerabilidades con Nessus.
4. Arquitectura de Red
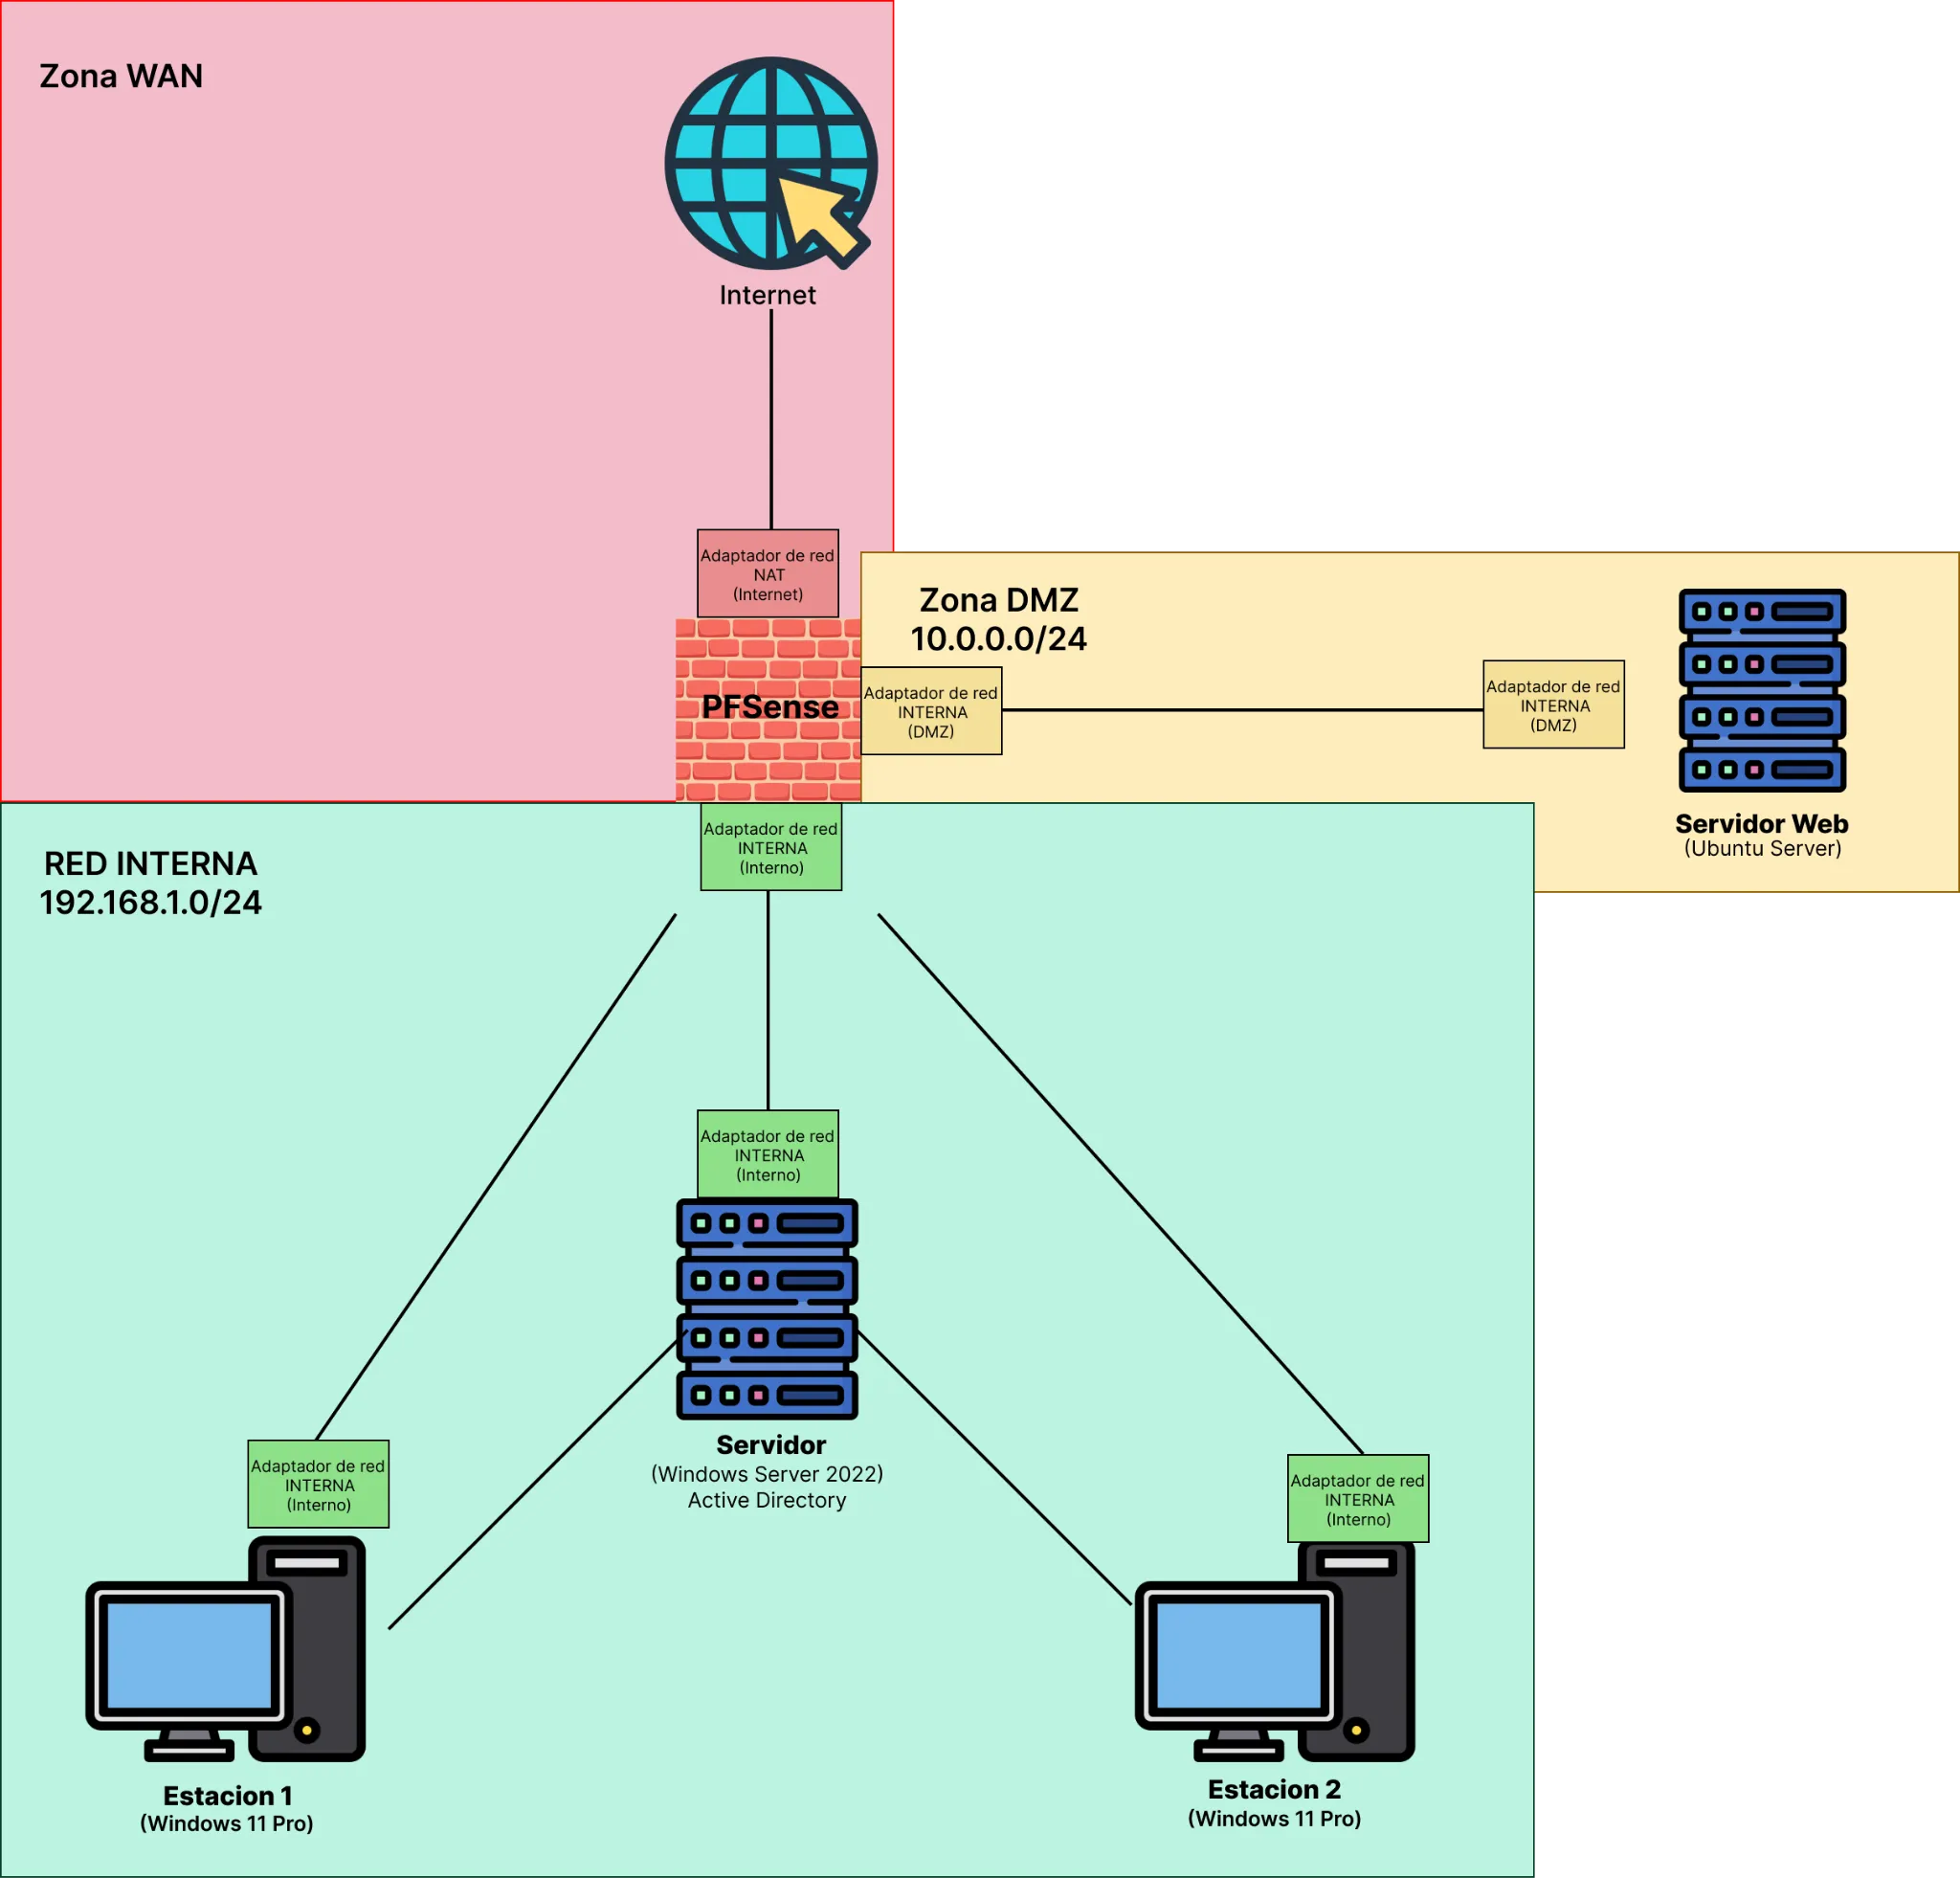
4.1. Tabla de Subredes
| Zona | Subred | Gateway | Función |
|---|---|---|---|
| WAN | DHCP ISP | — | Acceso a Internet |
| LAN | 192.168.1.0/24 | 192.168.1.1 | AD DS, Splunk, Nessus, clientes |
| DMZ | 10.0.0.0/24 | 10.0.0.1 | Ubuntu Server, servicios web |
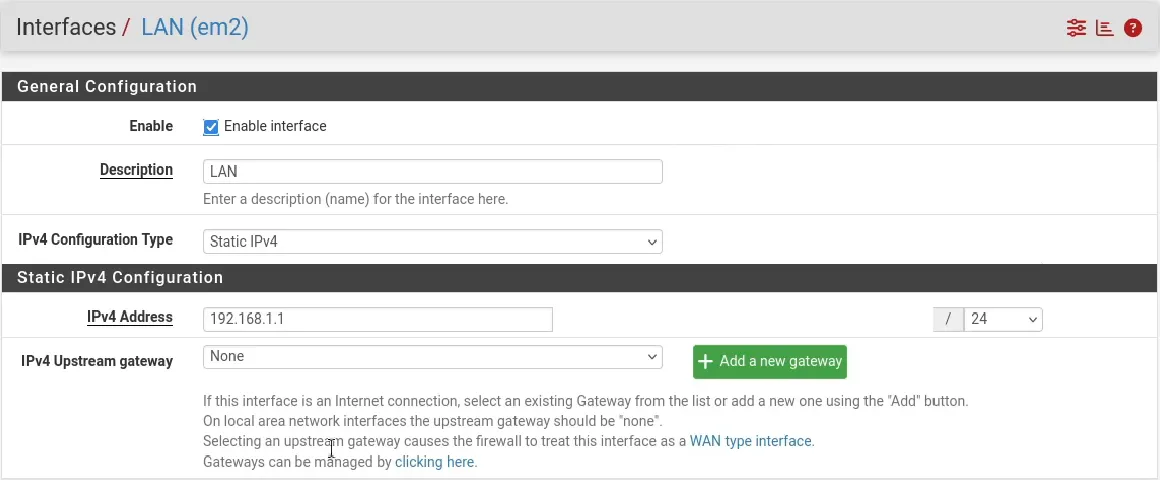
4.2. Interfaces de pfSense
| Interfaz | Adaptador | Tipo | Función | IP |
|---|---|---|---|---|
| em0 | WAN | NAT | Conexión a Internet | Asignada por ISP |
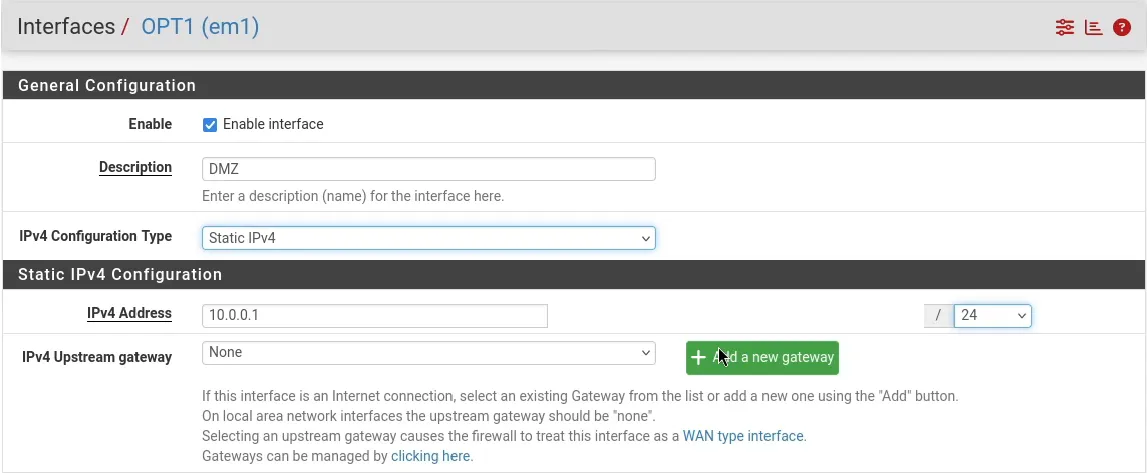
| em1 | DMZ | Interna | Red pública segura | 10.0.0.1/24 |
| em2 | LAN | Interna | Red interna | 192.168.1.1/24 |
5. Inventario de Componentes
5.1. Hardware / VMs
| Componente | RAM | CPU | Almacenamiento | Adaptadores | Tipo |
|---|---|---|---|---|---|
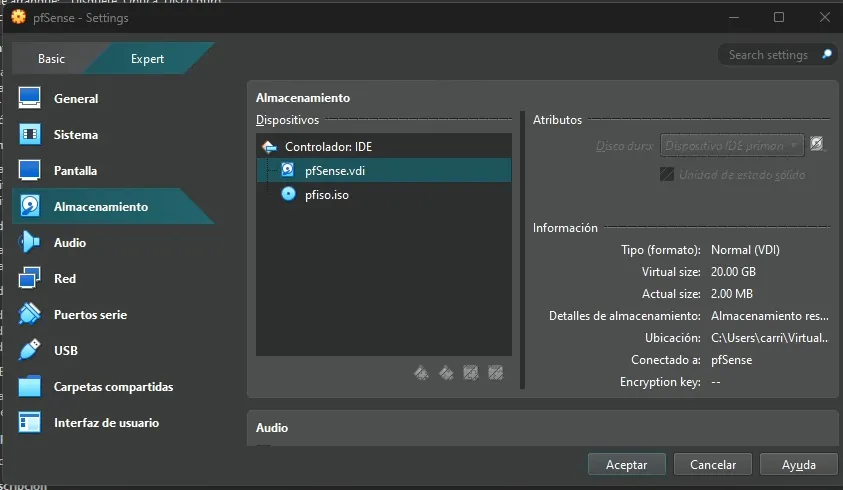
| pfSense | 2GB | 2 | 20GB | 3 | NAT, Interna, Interna |
| Windows Server | 4GB | 3 | 50GB | 1 | Interna (LAN) |
| Ubuntu Server | 4GB | 2 | 30GB | 1 | Interna (DMZ) |
| Estaciones Win10/11 | 4GB | 4 | 80GB | 1 | Interna (LAN) |
5.2. Software y Versiones
- pfSense 2.8.0 + Suricata 7.0.8_2
- Windows Server 2022
- Splunk Enterprise 10.0.0 + UF 10.0.0
- Nessus Essentials 10.9.2
6. Implementación Base
6.1. pfSense
-
Instalación desde ISO y asignación de interfaces.

-
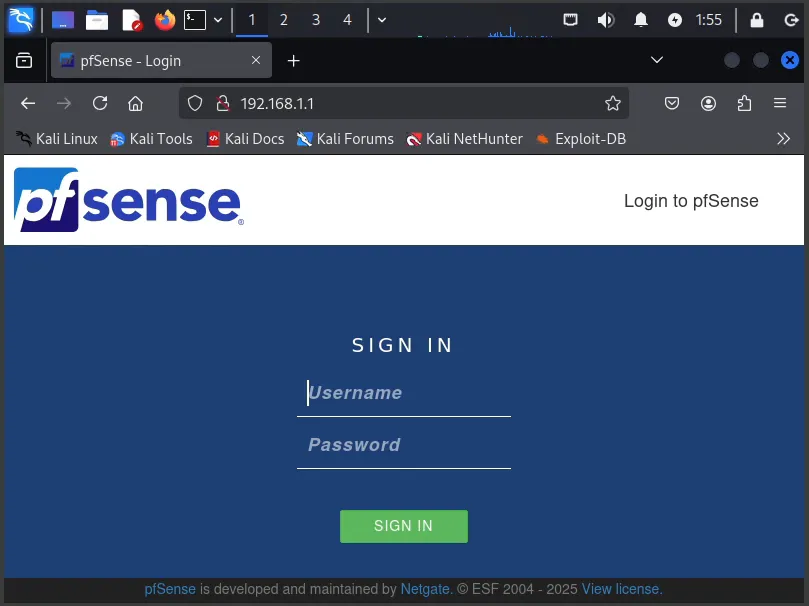
Configuración inicial vía HTTP desde Kali Linux temporal.
-
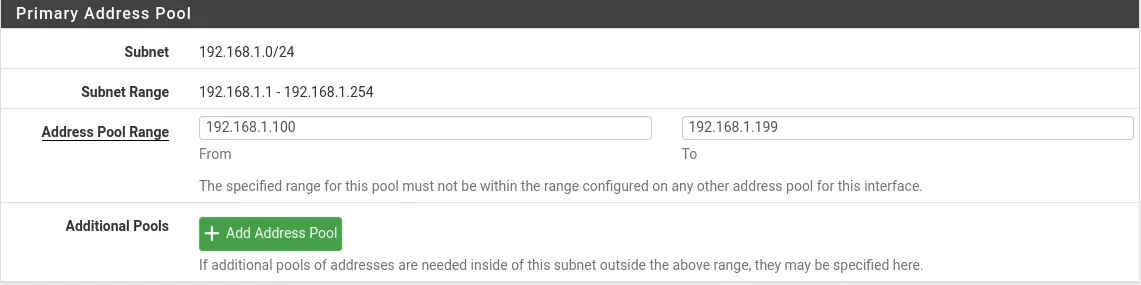
Asignación de IPs estáticas en LAN y DMZ, y DHCP en LAN.
Comentarios
- Si no se remueve el .iso, pfSense reinicia el setup como si fuera la primera vez.
- Se usa Kali Linux como puente temporal para acceder a la gestión HTTP.
- La interfaz OPT se renombra a DMZ para reflejar su función.
6.2. Active Directory + DNS
-
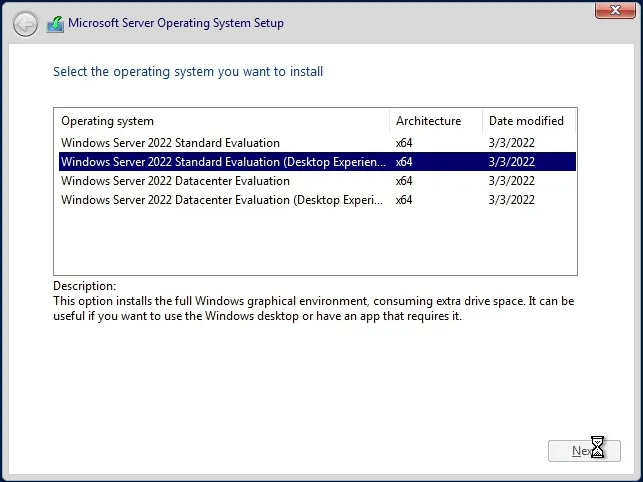
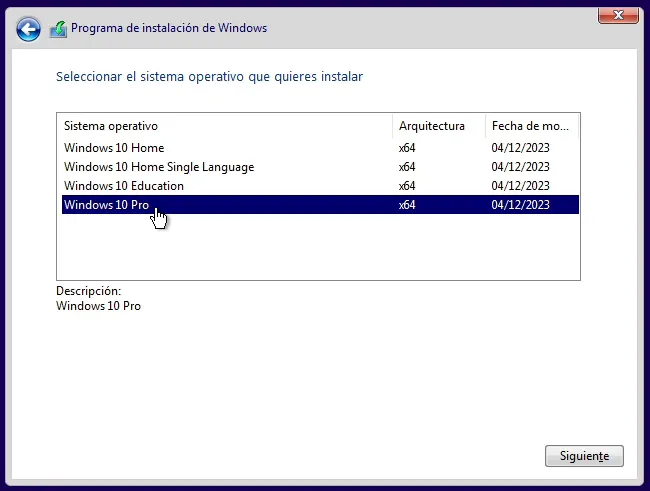
Instalación de Windows Server desde .iso.
-
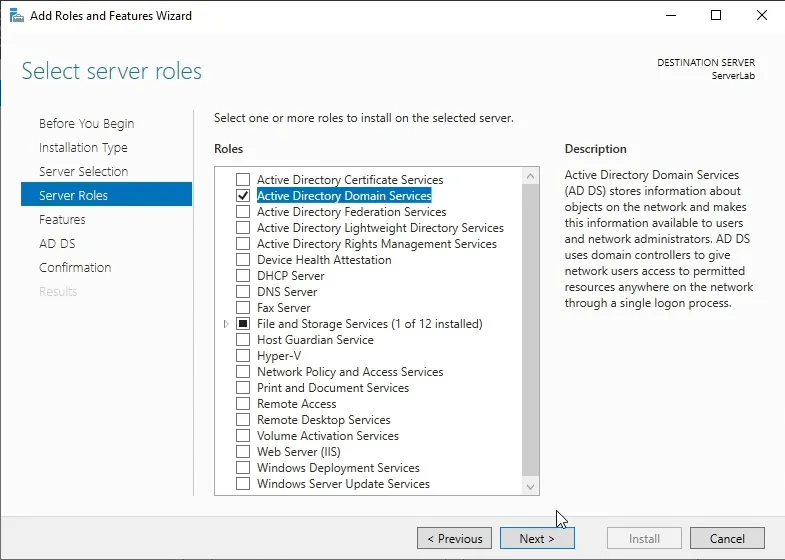
Instalación de rol AD DS en Windows Server.
-
Creación de dominio: lab.ciberlabs.local.

-
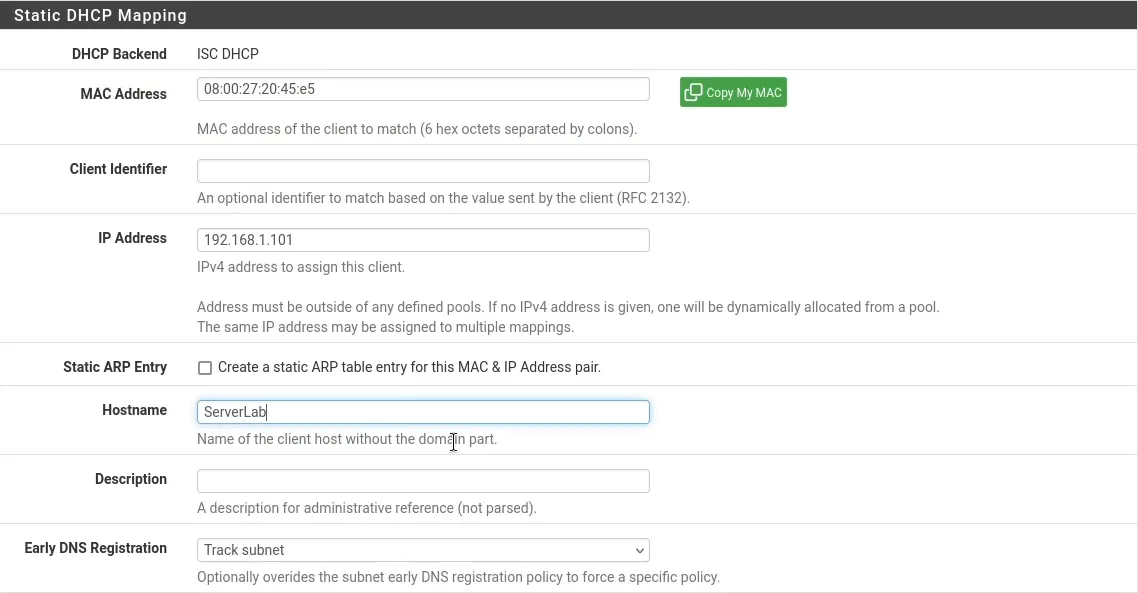
Asignación de IP estática a Windows Server vía DHCP static mapping en pfSense.
Comentarios
- La IP estática garantiza conectividad estable para servicios de dominio.
6.3. Estaciones de Trabajo + Ubuntu Server
-
Instalación de Windows 11 desde .iso.
-
Agregar registro a DNS Server para que las estaciones puedan obtener la IP del Windows Server.

-
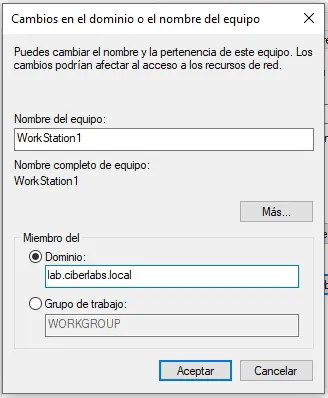
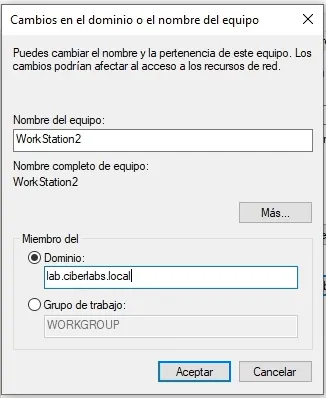
Unión al dominio.
-
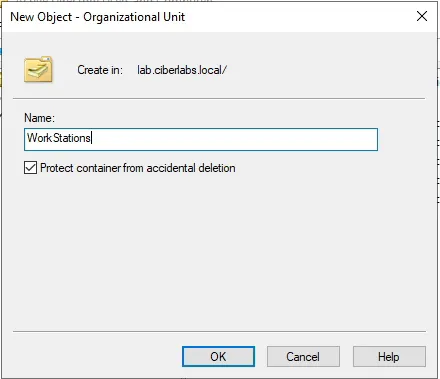
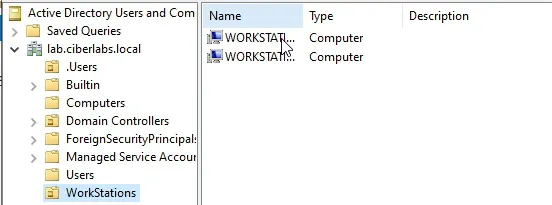
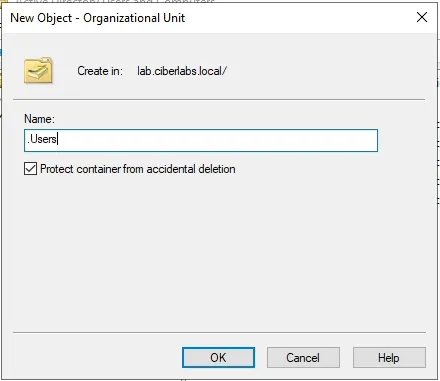
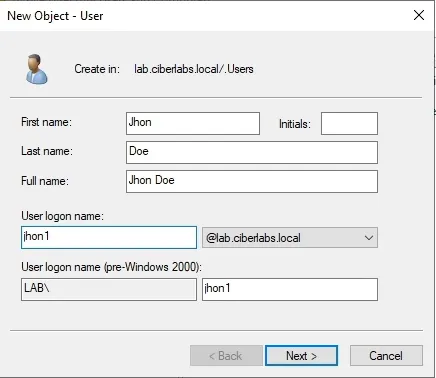
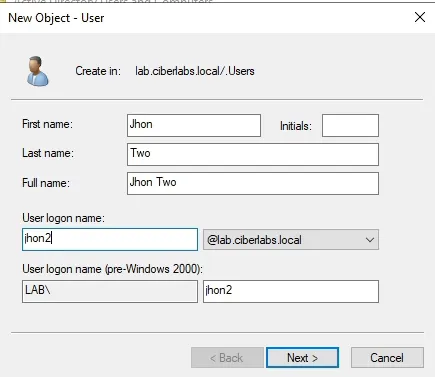
Creación de OUs (WORKSTATIONS, USERS) y usuarios (jhon1, jhon2).
-
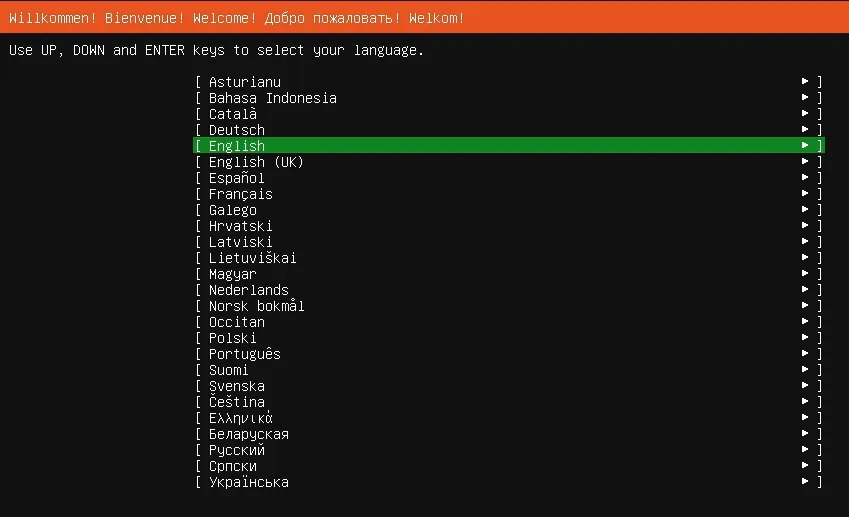
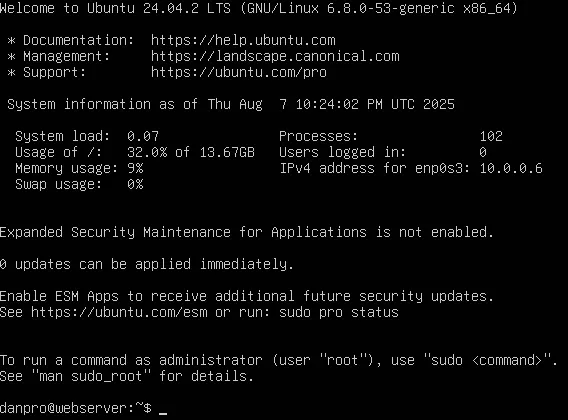
Instalación de Ubuntu Server desde .iso
-
Asignación de IP estática por DHCP Static Mapping a Ubuntu Server.

-
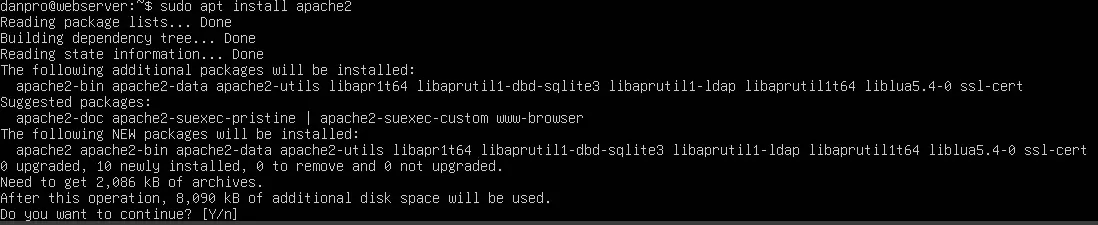
Hosting web con Apache
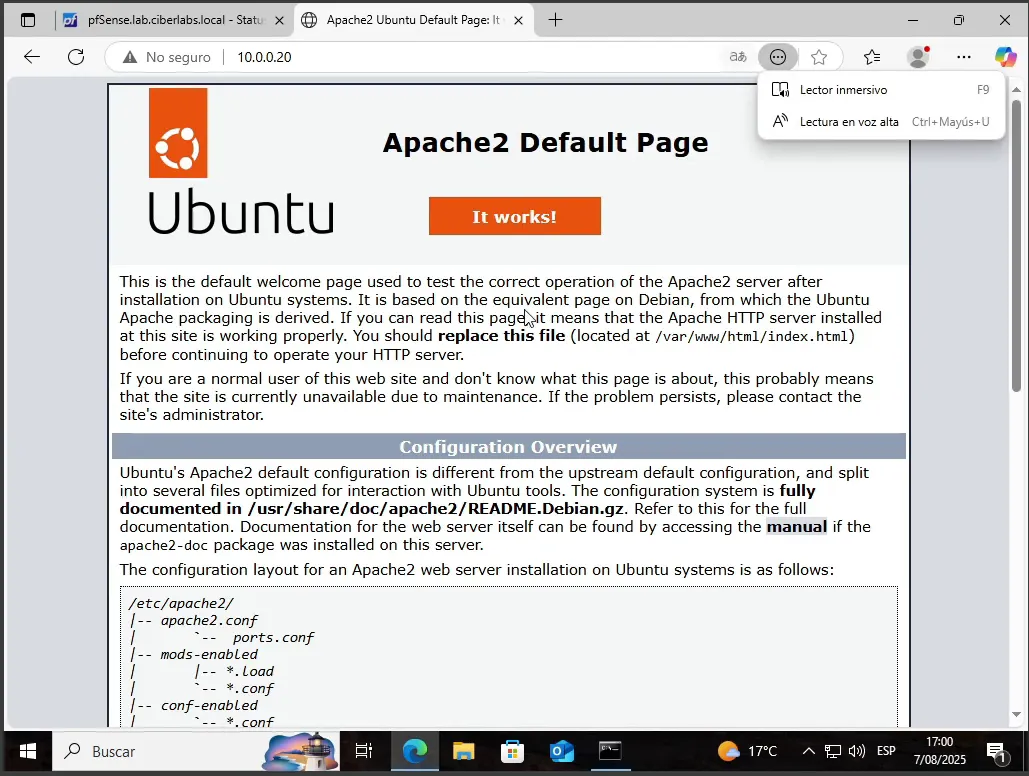
-
Creación de GPO para estaciones de trabajo
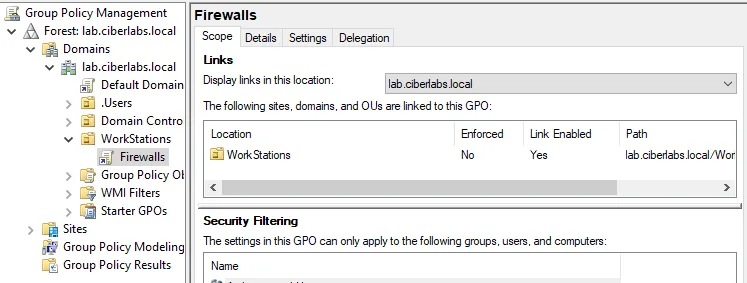
-
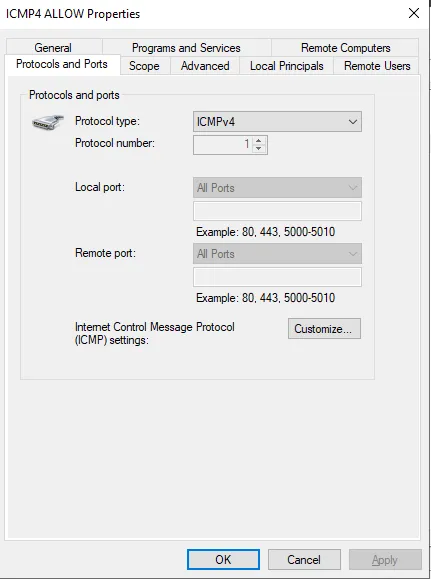
Habilitar ICMP por firewall en GPO
Comentarios
- El registro en pfSense es clave para que las estaciones resuelvan el dominio correctamente.
- La GPO permite verificar conectividad entre estaciones por ping.
- Apache se instala como base para futuras pruebas de penetración.
7. Splunk Enterprise + Universal Forwarders
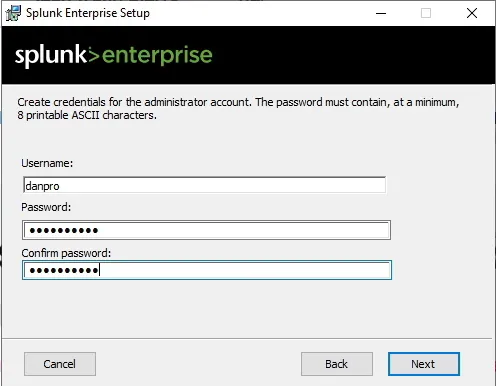
7.1. Splunk Enterprise
-
Instalación en Windows Server.
-
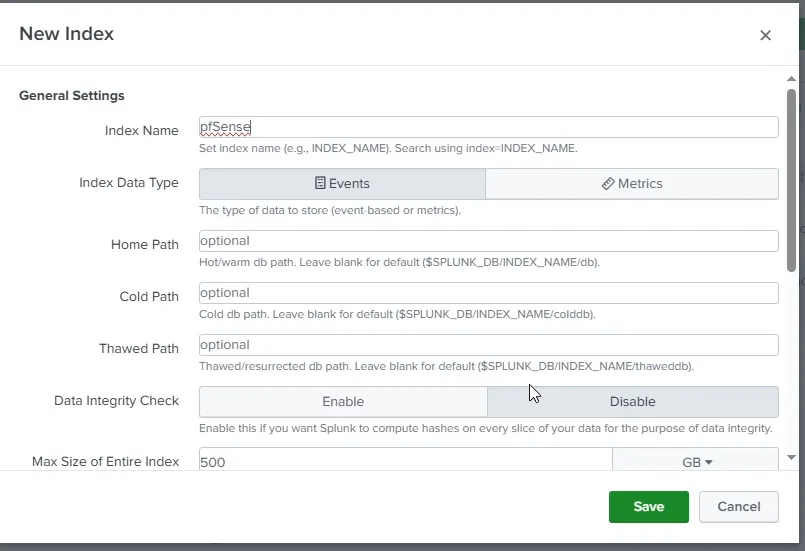
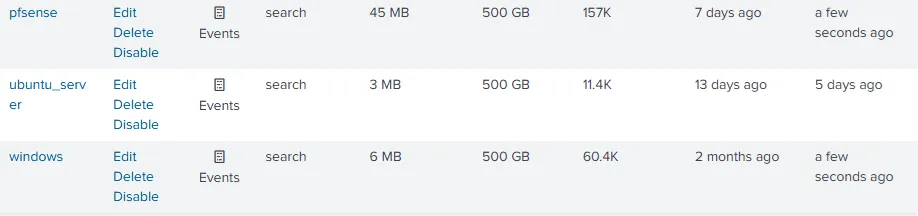
Índices creados: windows, ubuntu_server, pfsense.
-
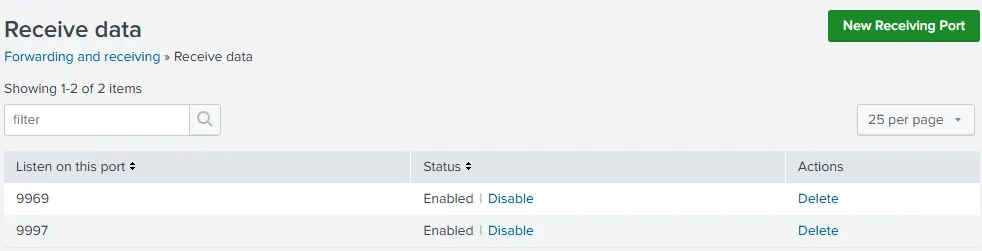
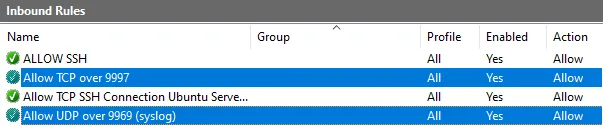
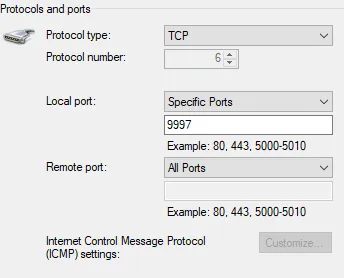
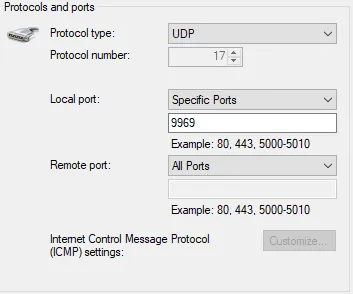
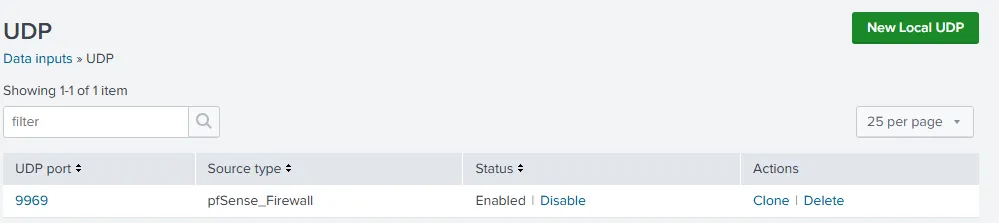
Puertos 9997 y 9969 habilitados para recepción de logs.
-
Regla de firewall para recepción de datos.
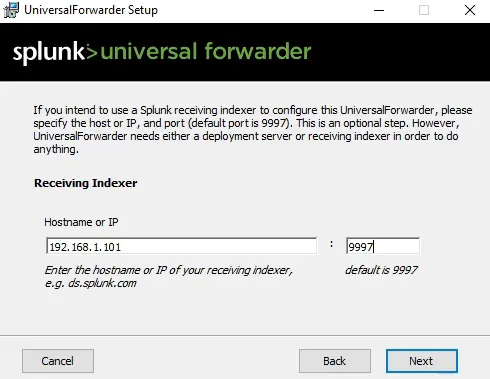
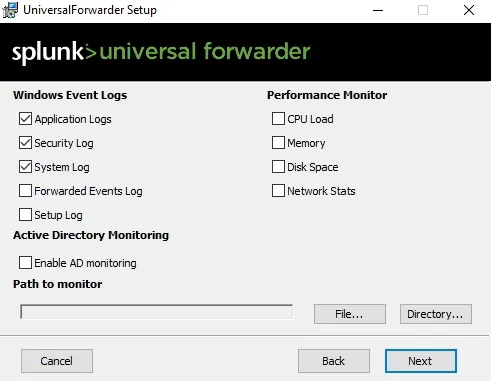
7.2. Universal Forwarders
-
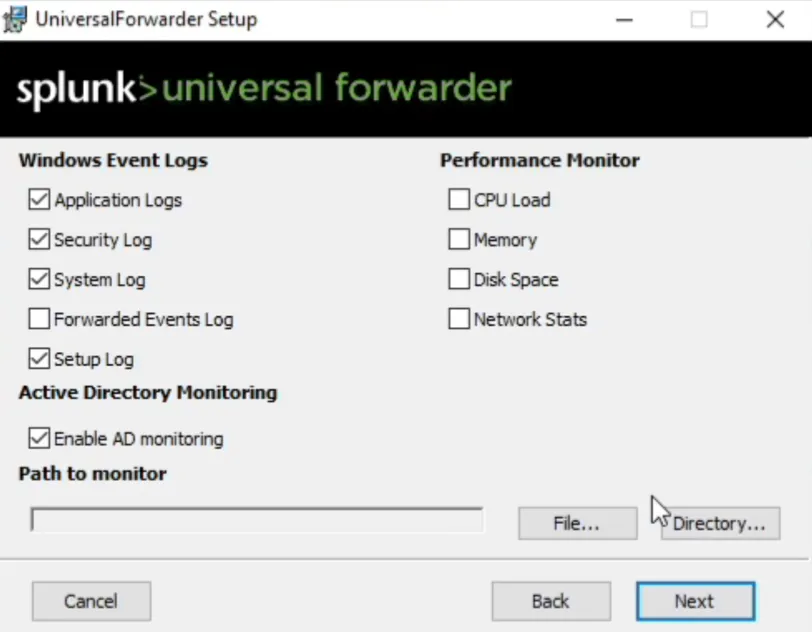
Instalación de UF en Windows Server
-
Instalación de UF en Ubuntu Server

-
Instalación de UF en estaciones de trabajo
-
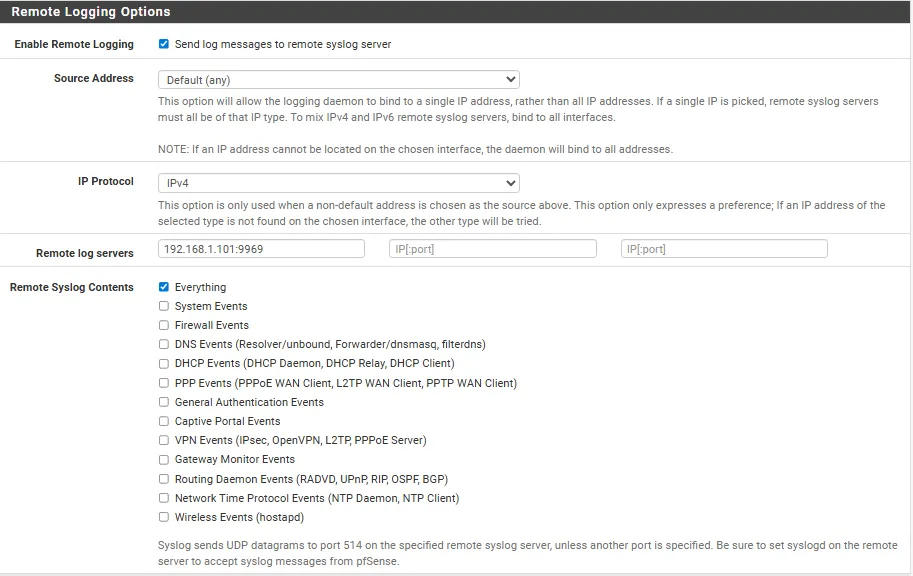
Configuración de redirección de logs de pfSense
-
Habilitar recepción de logs por UDP
Comentarios
- La regla de firewall en Windows Server es obligatoria para recibir datos por el puerto 9997.
- El input UDP permite recibir logs de pfSense sin forwarder.
- La selección de logs en Ubuntu Server cubre eventos clave del sistema.
8. Suricata IDS/IPS
8.1. Instalación
-
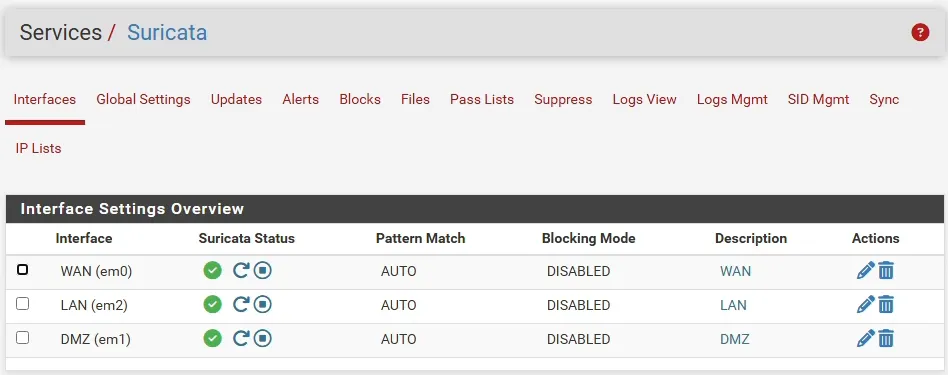
Instalado desde el Package Manager de pfSense.

-
Interfaces activas: WAN, LAN, DMZ.
-
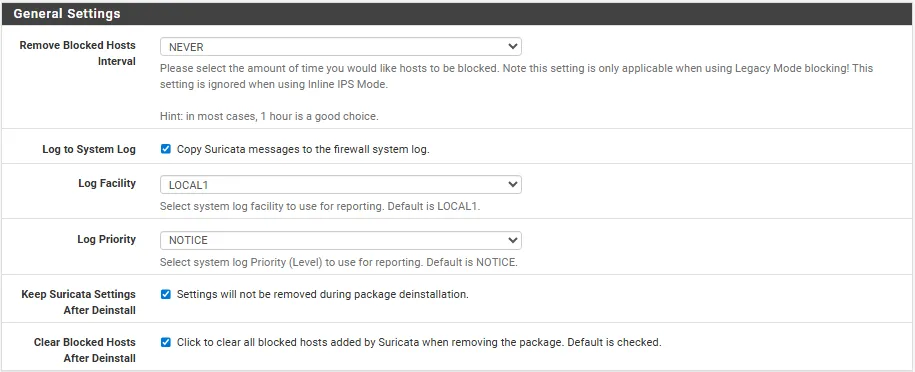
Redirección de logs a System Log para Splunk.
8.2. Configuración Crítica
-
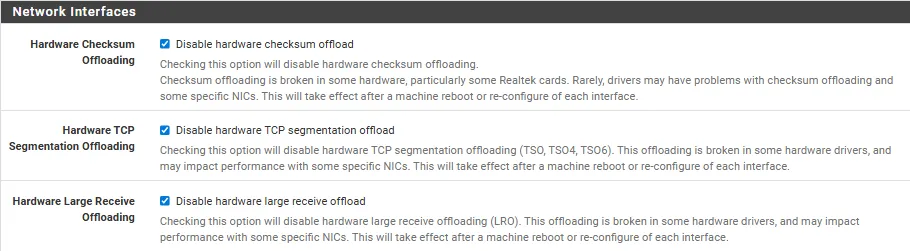
Desactivación de:
- Hardware Checksum Offloading
- TCP Segmentation Offloading
- Large Receive Offloading
8.3. Reglas activadas
-
ET Open Rules y Snort GPLv2 Rules activadas.

-
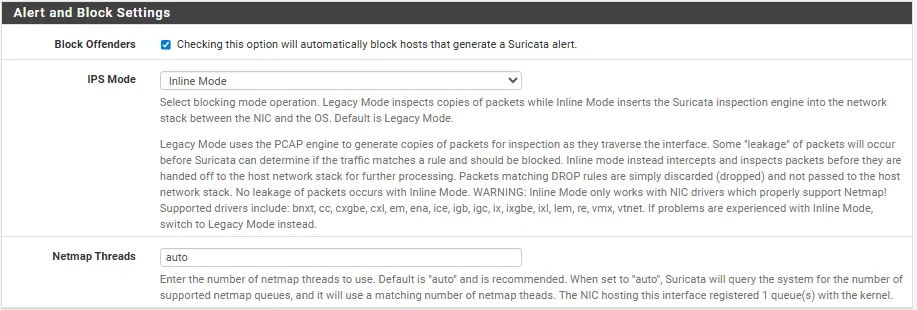
WAN configurada como IPS (bloqueo activo)
Comentarios
- Si no se desactivan las opciones de offloading, Suricata puede bloquear tráfico DNS por checksums inválidos.
- Las reglas ETOpen y Snort GPLv2 fueron elegidas ya que son libres y no requieren autenticación.
9. Configuración de Nessus
9.1. Instalación
-
Nessus Essentials instalado en Windows Server.
-
Activación de escaneo autenticado mediante SSH en Ubuntu Server.
- SSH instalado
- SSH instalado
9.2. Implementación de escaneos
- Creación de escaneos

9.3. Escaneos Realizados
| Nombre del Escaneo | Zona | Tipo de Escaneo | Errores |
|---|---|---|---|
| LAN Scan | LAN | Completo | No |
| DMZ Scan | DMZ | Completo | No |
-
LAN Scan
-
DMZ Scan
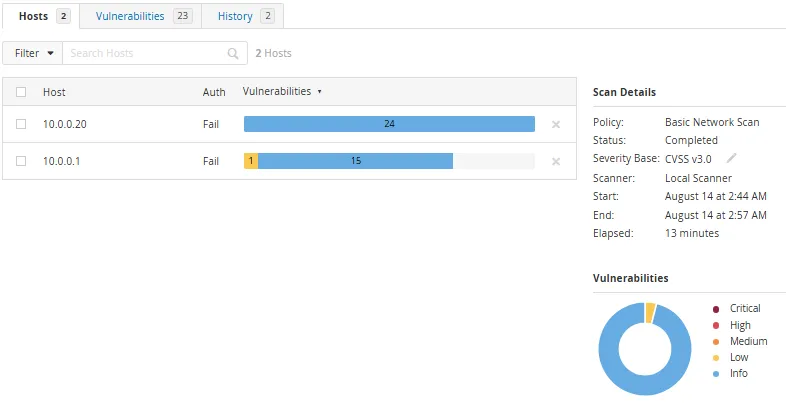
Comentarios
- El servicio SSH en Ubuntu Server permite que Nessus acceda a la DMZ.
- Los escaneos están diseñados para evaluar vulnerabilidades en ambas zonas de red.
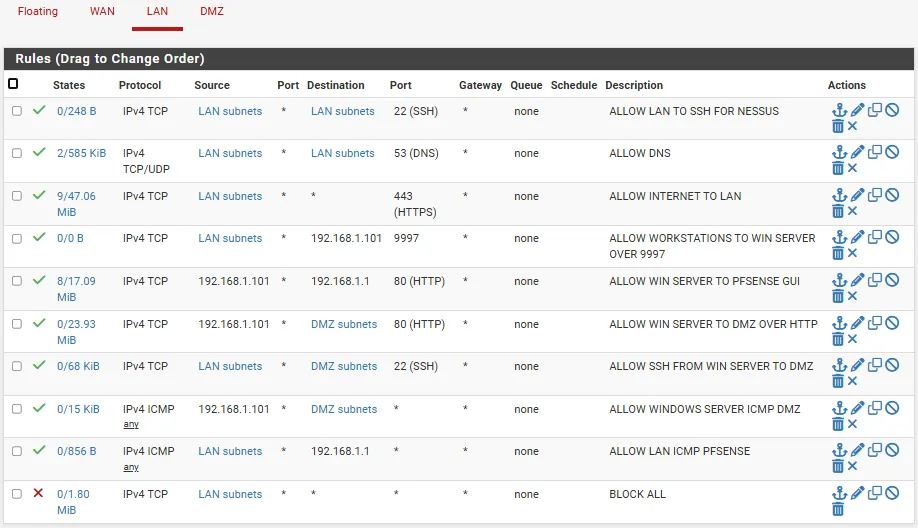
10. Reglas de Firewall (pfSense)
10.1. Reglas LAN
| Acción | Protocolo | Puerto | Destino | Descripción |
|---|---|---|---|---|
| Permitir | DNS | 53 | Internet | Resolución de nombres |
| Permitir | HTTPS | 443 | Internet | Acceso web seguro |
| Permitir | HTTP | 80 | pfSense GUI | Gestión desde Windows Server |
| Permitir | SSH | 22 | LAN / DMZ | Escaneo autenticado desde Nessus |
| Permitir | HTTP | 80 | DMZ | Acceso a servidor web Ubuntu |
| Permitir | ICMP | — | DMZ | Pruebas de conectividad |
| Permitir | TCP | 9997 | Windows Server | Recepción de logs desde estaciones |
| Bloquear | Todos | — | — | Tráfico no autorizado |
10.2. Reglas DMZ (em3)
| Acción | Protocolo | Puerto | Destino | Descripción |
|---|---|---|---|---|
| Permitir | TCP | 9997 | Windows Server | Envío de logs desde Ubuntu Server |
| Bloquear | Todos | — | — | Tráfico no autorizado |

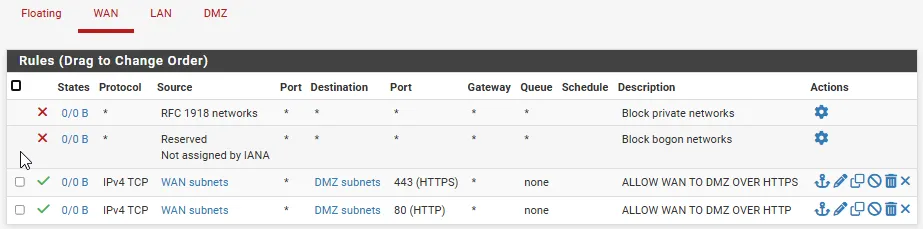
10.3. Reglas WAN
| Acción | Protocolo | Puerto | Destino | Descripción |
|---|---|---|---|---|
| Permitir | TCP | 80/443 | DMZ | Acceso externo a servicios web |
11. Pruebas y Validación
11.1. Casos de Prueba
| Componente | Prueba | Resultado |
|---|---|---|
| Splunk | Recepción de logs desde UF | Correcto |
| AD DS | Unión de estaciones al dominio | Correcto |
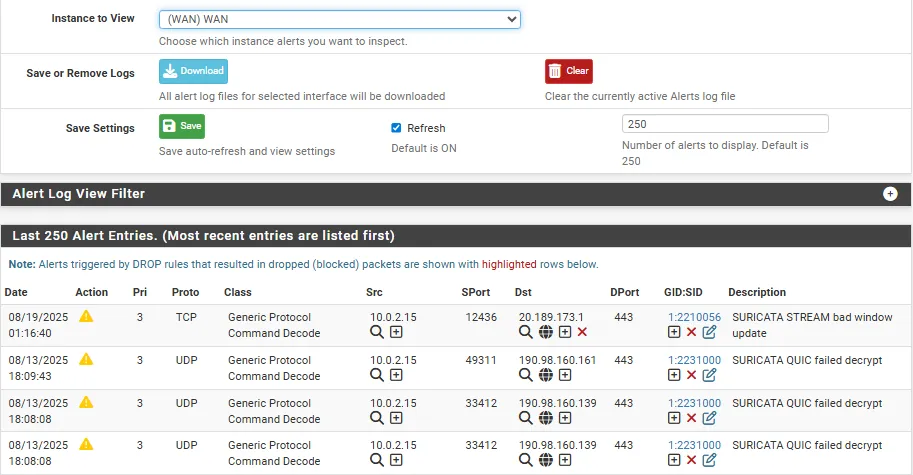
| Suricata | Detección de alertas IDS/IPS | Correcto |
| Nessus | Escaneo autenticado en LAN/DMZ | Correcto |
-
Splunk
-
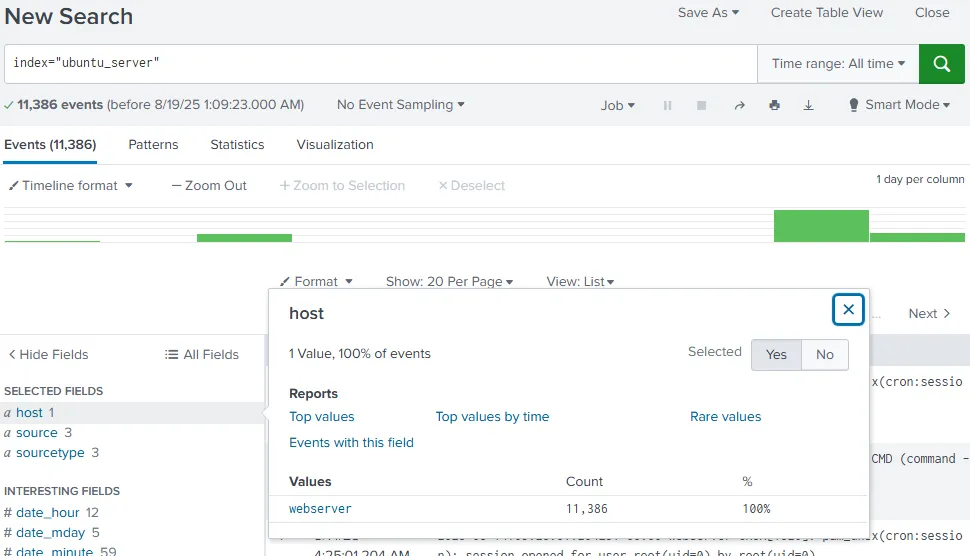
Logs al índice “Windows”
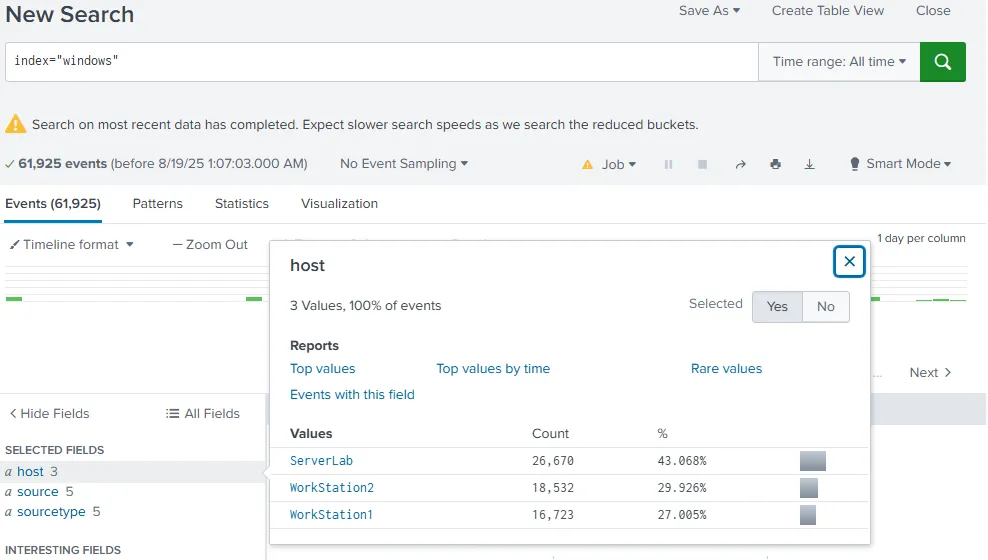
-
Logs al índice “Ubuntu_Server”
-
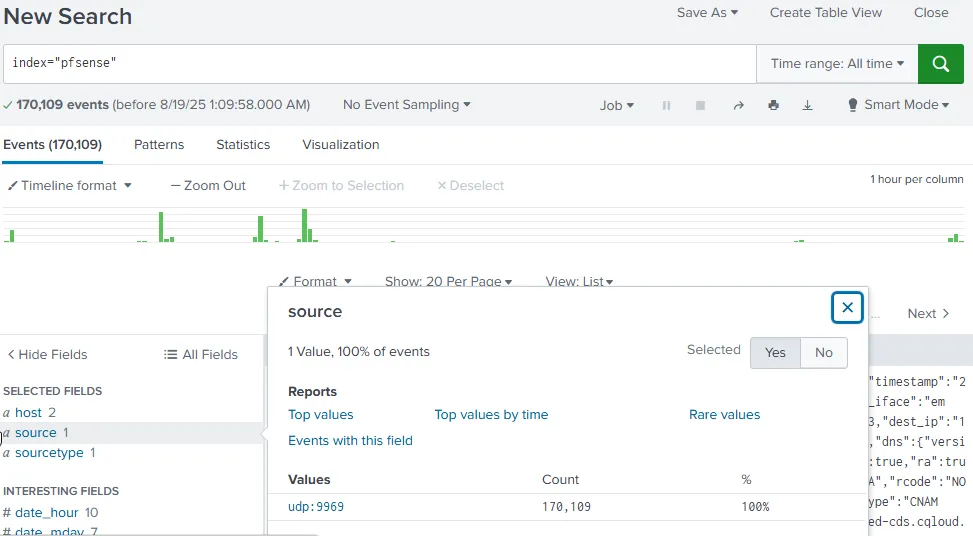
Logs al índice “pfSense”
-
-
AD DS
-
Suricata
-
Nessus
-
LAN Scan
-
DMZ Scan
-
12. Lecciones Aprendidas y Recomendaciones
12.1. Retos Técnicos
-
Splunk Free limita el volumen de datos y retención.
-
Suricata requiere desactivar el offloading para evitar falsos positivos.
12.2. Recomendaciones
- Considerar migración a Splunk Enterprise para mayor capacidad.
13. Conclusión
Este laboratorio representa una plataforma completa para simular escenarios reales de ciberseguridad. La integración de herramientas clave permite practicar detección, análisis y respuesta ante incidentes. La segmentación de red, el monitoreo centralizado y la validación operativa consolidan un entorno ideal para aprendizaje técnico y demostración profesional.
Project : Homelab implementation for practices of Cybersecurity
Author: Daniel Carrion
Role: Systems engineering student (6th cycle)
Last update date: 05-20-2025
1. Summary
General objective: Design and implement a virtual environment controlled to simulate real cybersecurity scenarios, including penetration tests, vulnerability management, event monitoring and incident response. This laboratory seeks strengthen technical skills through operational practices, integrating key tools such as Pfsense, Suricata, Splunk, Nessus and Active Directory.
Technical reach: Essential services such as Active were deployed Directory, DNS, DHCP, IDS/IPS, SIEM and Escane of Vulnerabilities. He environment includes work stations, Linux and Windows servers, and Segmented areas (LAN, DMZ, WAN).
Key results
-
Splunk receives logs of stations, servers and pfsense.
-
Suricata detects and blocks malicious traffic.
-
Nessus identifies vulnerabilities in LAN and DMZ.
-
Firewall rules correctly segment traffic.
2. Context and motivation
Personal motivation: The creation of this laboratory responds to desire to acquire practical experience in offensive cybersecurity and defensive. The environment allows to validate theoretical knowledge through real simulations, facilitating discovery learning and Continuous improvement.
Initial challenges
-
Segmented network configuration with multiple interfaces.
-
Integration of tools with consistent logs flows.
-
Validation of connectivity between areas for authenticated scan.
Expected benefits
-
Consolidation of technical skills in real environments.
-
Preparation for certifications such as CompTIA Linux+, Pentest+, etc.
-
Creation of a demonstrable technical portfolio.
3. Detailed objectives
-
Segment WAN / LAN / DMZ with pfSense.
-
Deploy Active Directory + DNS in LAN.
-
Integrate Suricata AS IDS/IPS.
-
Install and configure Splunk Enterprise + Universal Forwarders.
-
Execute vulnerabilities audits with Nessus.
4. Network architecture
4.1. Subnet table
| Area | Subnet | Gateway | Function |
|---|---|---|---|
| Wan | DHCP ISP | - | Internet access |
| Lan | 192.168.1.0/24 | 192.168.1.1 | AD DS, Splunk, Nessus, customers |
| DMZ | 10.0.0.0/24 | 10.0.0.1 | Ubuntu Server, Web Services |
4.2. pfSense interfaces
| Interface | Zone | Adapter | Function | IP |
|---|---|---|---|---|
| em0 | Wan | Nat | Internet connection | Assigned by ISP |
| em1 | DMZ | Internal | Safe public network | 10.0.0.1/24 |
| em2 | Lan | Internal | Internal network | 192.168.1.1/24 |
5. Component inventory
5.1. Hardware / VMS
| Component | RAM | CPU | Storage | Adapters | Type |
|---|---|---|---|---|---|
| pfsense | 2GB | 2 | 20GB | 3 | Nat, internal, internal |
| Windows Server | 4GB | 3 | 50GB | 1 | Internal (LAN) |
| Ubuntu server | 4GB | 2 | 30GB | 1 | Internal (dmz) |
| Stations win10/11 | 4GB | 4 | 80GB | 1 | Internal (LAN) |
5.2. Software and versions
- pfSense 2.8.0 + Suricata 7.0.8_2
- Windows Server 2022
- Splunk Enterprise 10.0.0 + UF 10.0.0
- Nessus essentials 10.9.2
6. Base implementation
6.1. Pfsense
-
installation from ISO and interface allocation.
-
Initial configuration via http from Kali Linux temporary.
-
Assignment of static IPs in LAN and DMZ, and DHCP in LAN.
Comments
- If the .iso is not removed, Pfsense restarts the Setup as if it were the first time.
- Kali Linux is used as a temporary bridge to access HTTP management.
- The OPT interface is renowned to DMZ to reflect its function.
6.2. Active Directory + DNS
-
Windows Server installation from .iso.
-
Installation of ad ds role in Windows Server.
-
Domain creation: Lab.ciberlabs.local.
-
Static IP allocation to Windows Server via DHCP Static Mapping in Pfsense.
Comments
- The static IP guarantees stable connectivity for domain services.
6.3. Work stations + Ubuntu Server
-
Windows 11 installation from .iso.
-
Add DNS Server record so that the stations can obtain the IP of the Windows Server.
-
Join to domain.
-
Creation of OUs (Workstations, Users) and users (Jhon1, Jhon2).
-
Ubuntu Server installation from .iso
-
Static IP allocation by DHCP Static Mapping to Ubuntu Server.
-
Web hosting with Apache
-
Creation of GPO for work stations
-
Enable ICMP by Firewall in GPO
Comments
- The registration in pfSense is important for the stations to solve the domain correctly.
- The GPO allows to verify connectivity between ping stations.
- Apache is installed as a basis for future penetration tests.
7. Splunk Enterprise + Universal Forwarders
7.1. Splunk Enterprise
-
Installation in Windows Server.
-
Created indices: Windows, Ubuntu_Server, Pfsense.
-
Ports 9997 and 9969 enabled for logs reception.
-
Firewall rule for data reception.
7.2. Universal Forwarders
-
Installation of UF in Windows Server
-
Installation of UF in Ubuntu Server
-
Installation of UF in work stations
-
pfSense Logs Redirection Configuration
-
Enable Logs by UDP
Comments
- The Firewall rule in Windows Server is mandatory to receive data from port 9997.
- Input UDP allows you to receive pfSense logs without Forwarder.
- The selection of Logs in Ubuntu Server covers key events of the system.
8. Suricata IDS/IPS
8.1. Installation
-
Installed from the pfSense Package Manager.
-
Active interfaces: WAN, LAN, DMZ.
-
Redirection of Logs to System Log for Splunk.
8.2. Critical configuration
-
Deactivation of:
- Hardware Checksum offloading
- TCP Segmentation offloading
- Lark Receive Offloading
8.3. Activated rules
-
ET Open Rules and SNORT GPLV2 Rules activated.
-
WAN configured as IPS (active block)
Comments
- If offloading options are not deactivated, Suricata can block DNS traffic by invalid checksums.
- ET Open Rules and Snort GPLV2 rules were chosen as they are free and do not require authentication.
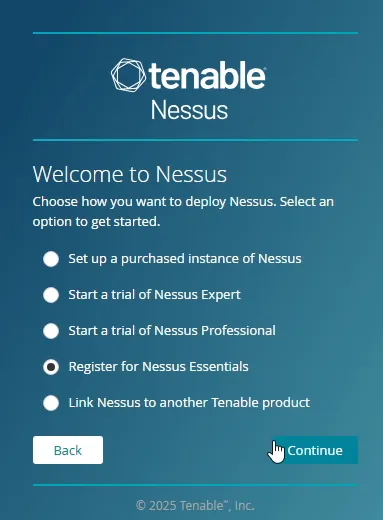
9. Nessus configuration
9.1. Facility
-
Nessus essentials installed in Windows Server.
-
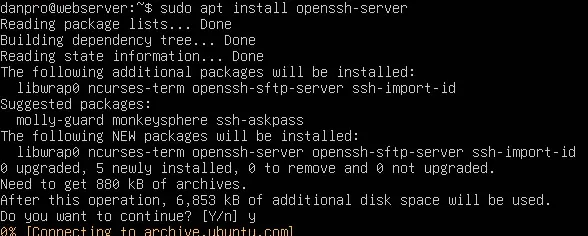
Authenticated scan activation by SSH in Ubuntu Server.
-
SSh installed
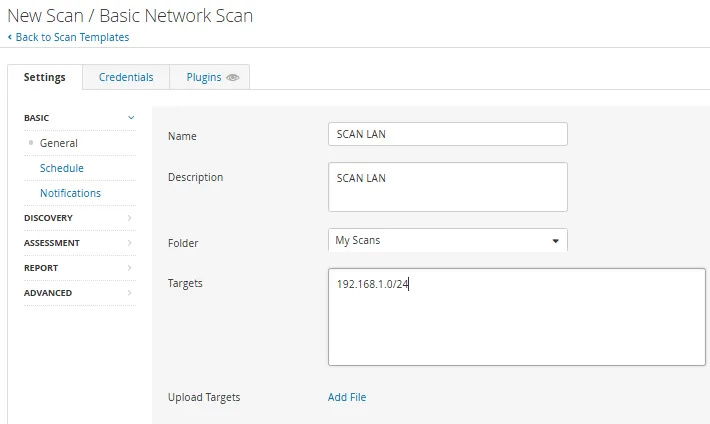
9.2. Scanning implementation
-
Creation of scanners
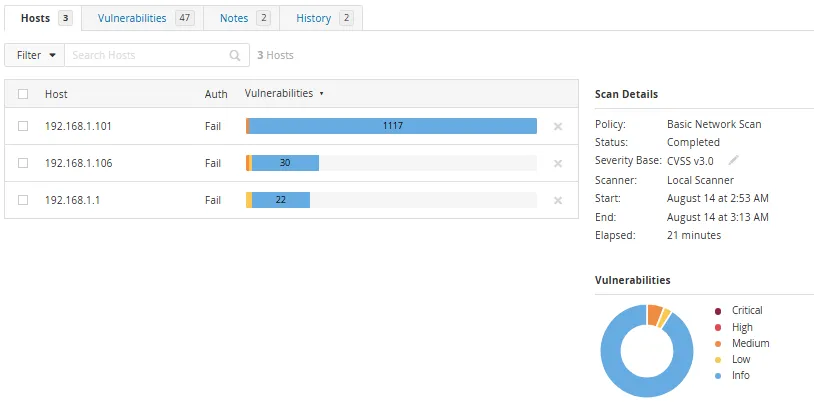
9.3. Scans made
| Scan name | Area | Type of scan | Errors |
|---|---|---|---|
| Lan scan | Lan | Full | No |
| Dmz scan | DMZ | Full | No |
-
LAN Scan
-
DMZ Scan
Comments
- The SSH service in Ubuntu Server allows Nessus to access the DMZ.
- The scans are designed to evaluate vulnerabilities in both network areas.
10. Firewall Rules (Pfsense)
10.1. LAN Rules
| Action | Protocol | Port | Destination | Description |
|---|---|---|---|---|
| Allow | DNS | 53 | Internet | Name resolution |
| Allow | Https | 443 | Internet | Safe web access |
| Allow | Http | 80 | pfsense gui | Management from Windows Server |
| Allow | Ssh | 22 | LAN / DMZ | Authenticated scan from Nessus |
| Allow | Http | 80 | DMZ | Access to Ubuntu Web Server |
| Allow | ICMP | - | DMZ | Connectivity tests |
| Allow | TCP | 9997 | Windows Server | Reception of logs from stations |
| Block | All | - | - | Block Unauthorized traffic |
10.2. DMZ Rules
| Action | Protocol | Port | Destination | Description |
|---|---|---|---|---|
| Allow | TCP | 9997 | Windows Server | Logs sending from Ubuntu Server |
| Block | All | - | - | Block Unauthorized traffic |
10.3. WAN Rules
| Action | Protocol | Port | Destination | Description |
|---|---|---|---|---|
| Allow | TCP | 80/443 | DMZ | External access to web services |
11. Tests and validation
11.1. Test cases
| Component | Proof | Result |
|---|---|---|
| Splunk | Reception of Logs from UF | Correct |
| AD DS | Union of domain stations | Correct |
| Suricata | IDS/IPS alert detection | Correct |
| Nessus | Authenticated scan in LAN/DMZ | Correct |
-
Splunk
-
Logs to the “Windows” index
-
Logs to the “Ubuntu_Server” index
-
Logs to the “PfSense” index
-
-
AD DS (Active Directory Domain Services)
-
Suricata
-
Nessus
-
LAN Scan
-
DMZ Scan
-
12. Lessons learned and recommendations
12.1. Technical challenges
-
Splunk Free limits the volume of data and retention.
-
Suricata requires deactivating offloading to avoid false positives.
12.2. Recommendations
- Consider migration to Splunk Enterprise for greater capacity.
13. Conclusion
This laboratory represents a complete platform to simulate real cybersecurity scenarios. Integration of tools Key allows to practice detection, analysis and response to incidents. Network segmentation, centralized monitoring and validation Operational consolidate an ideal environment for technical learning and Professional demonstration.